
Enjoy the journey around Connecticut's only Arnold Palmer design! Constructed in 2004, this 18-hole championship layout features 45 bunkers, multiple water hazards, and beautiful scenery. Prior to your round, warm up on the expansive grass driving range, full pitching and chipping complex and both putting greens.
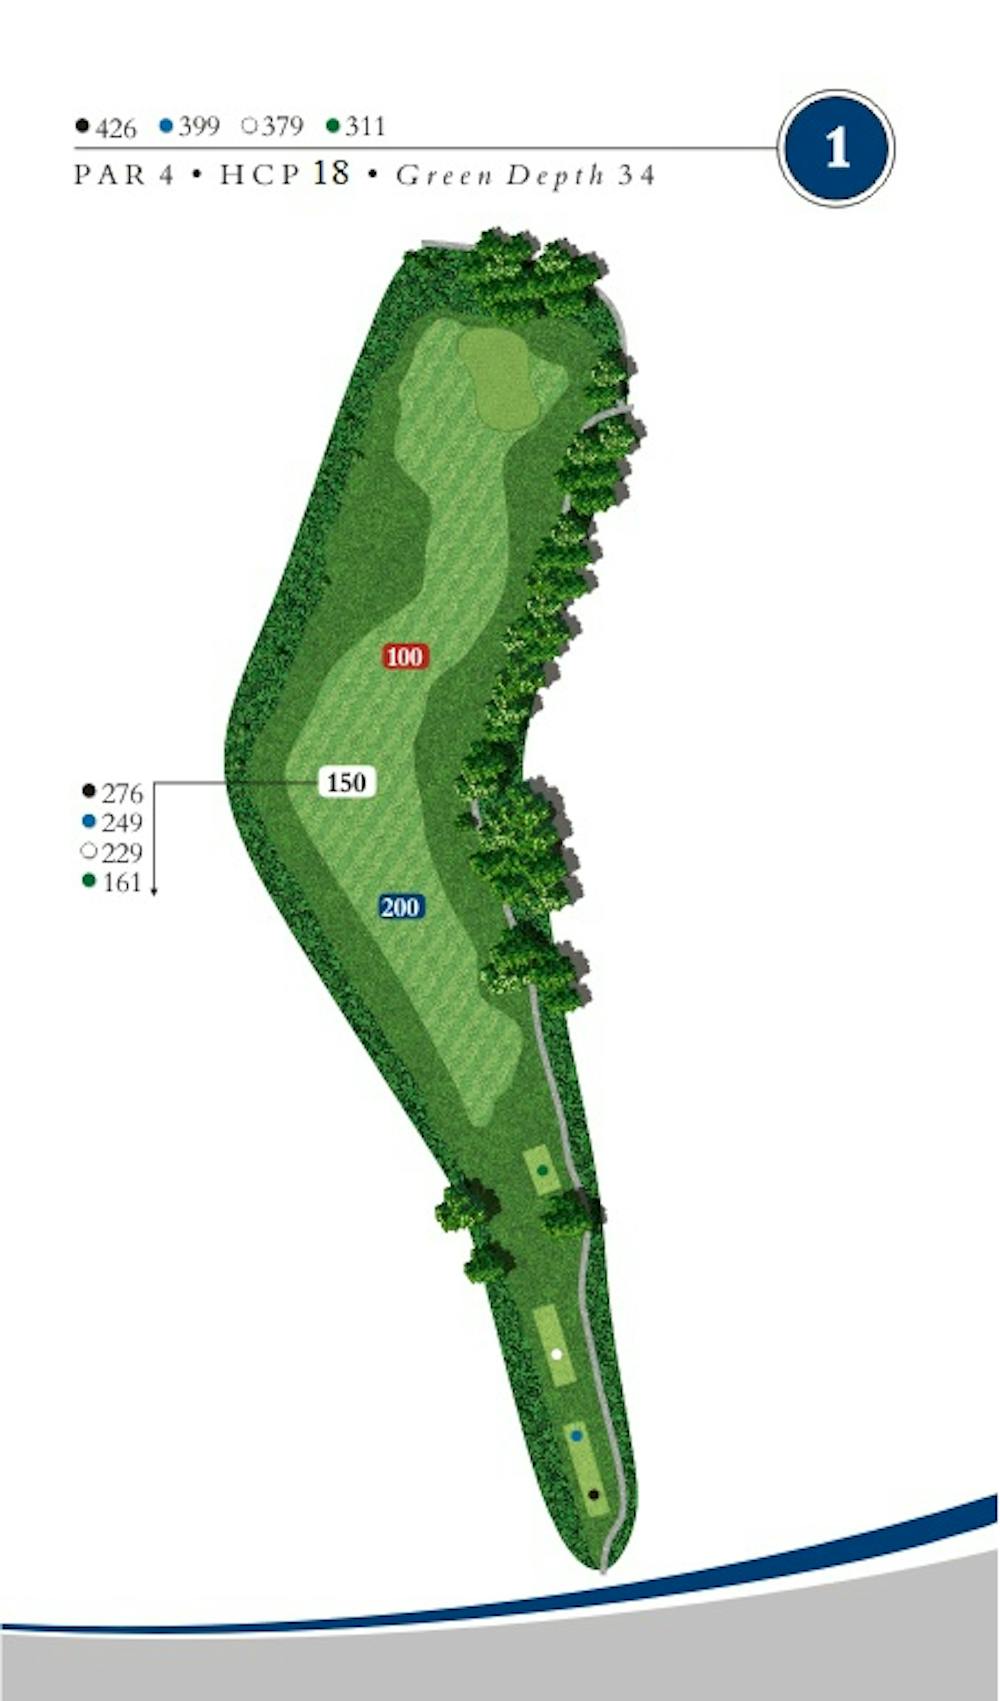
Hole #1
Par 4
Handicap-18
This par 4 is a slight dogleg right and is the only bunker-free hole on the course. Your tee shot should favor the left side of the fairway, avoiding the trees on the right. From there you will have an open approach to the green and a good chance to make par. Approaches missing short left will find a deep collection area, leaving a delicate recovery from a tight lie.
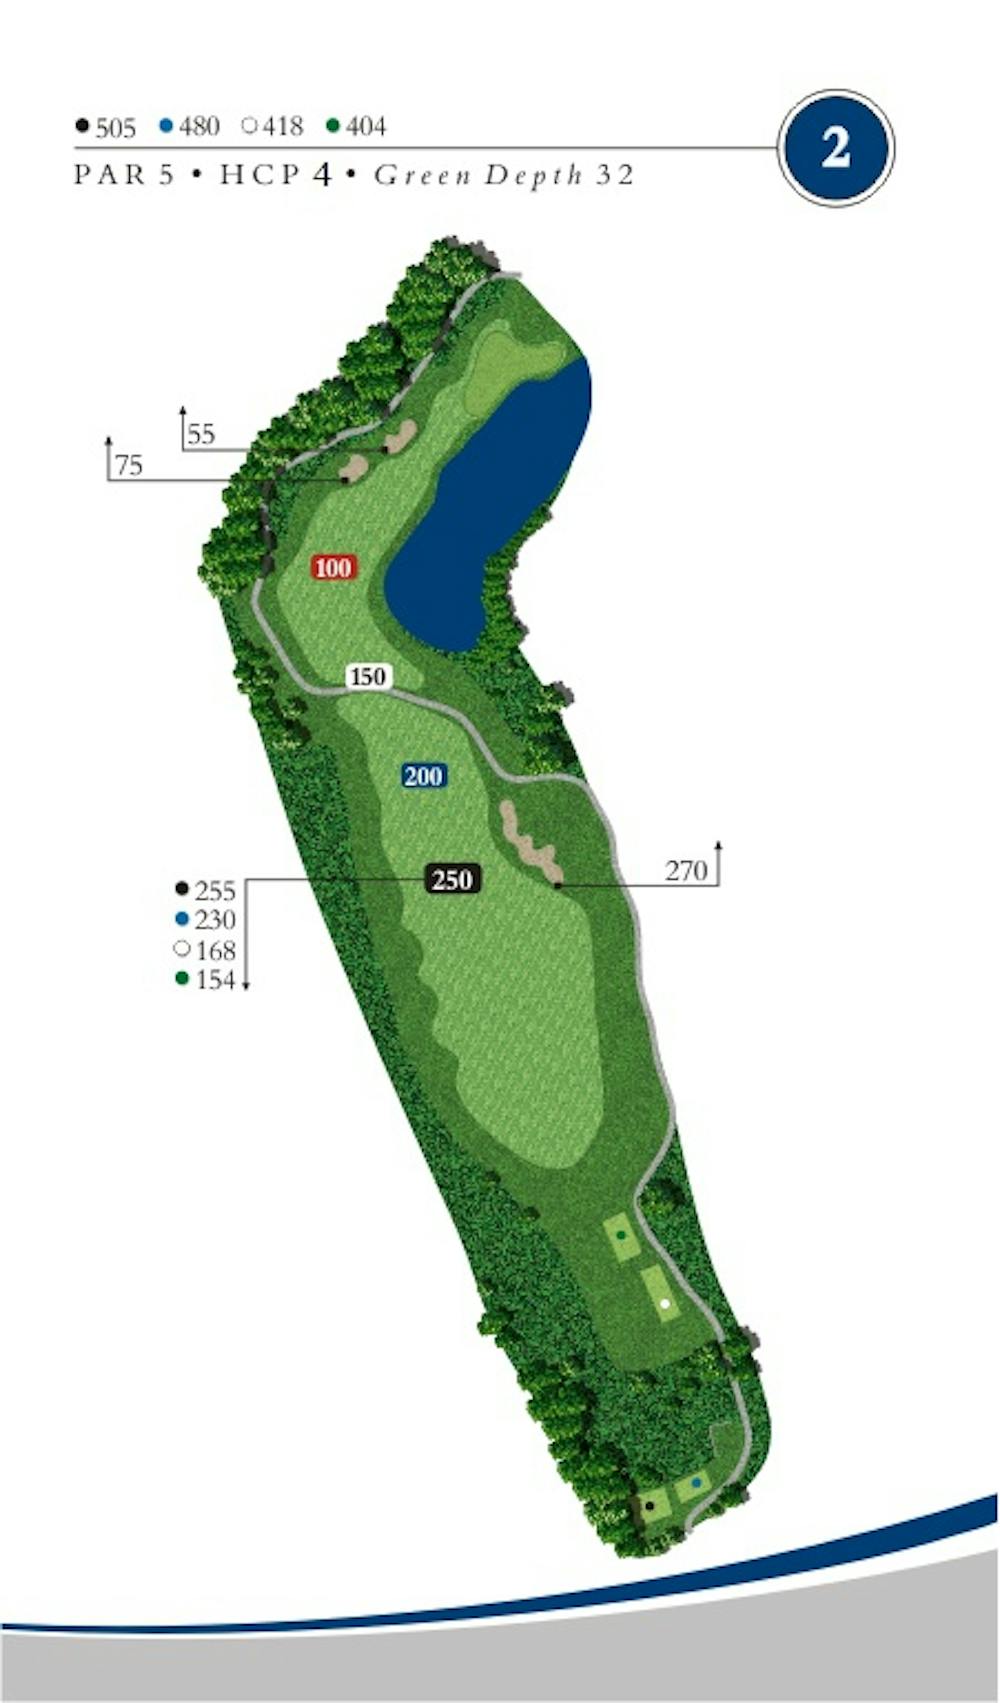
Hole #2
Par 5
Handicap-4
A magnificent par 5 featuring the Heublein Tower in the distance and a chance to go for the green in two. Grab the driver on this short par five as the fairway is the widest on the course (72yds). The safe play is to lay up on the left side of the fairway to avoid the large pond that fronts this green. A short approach over the water will give you a birdie putt.
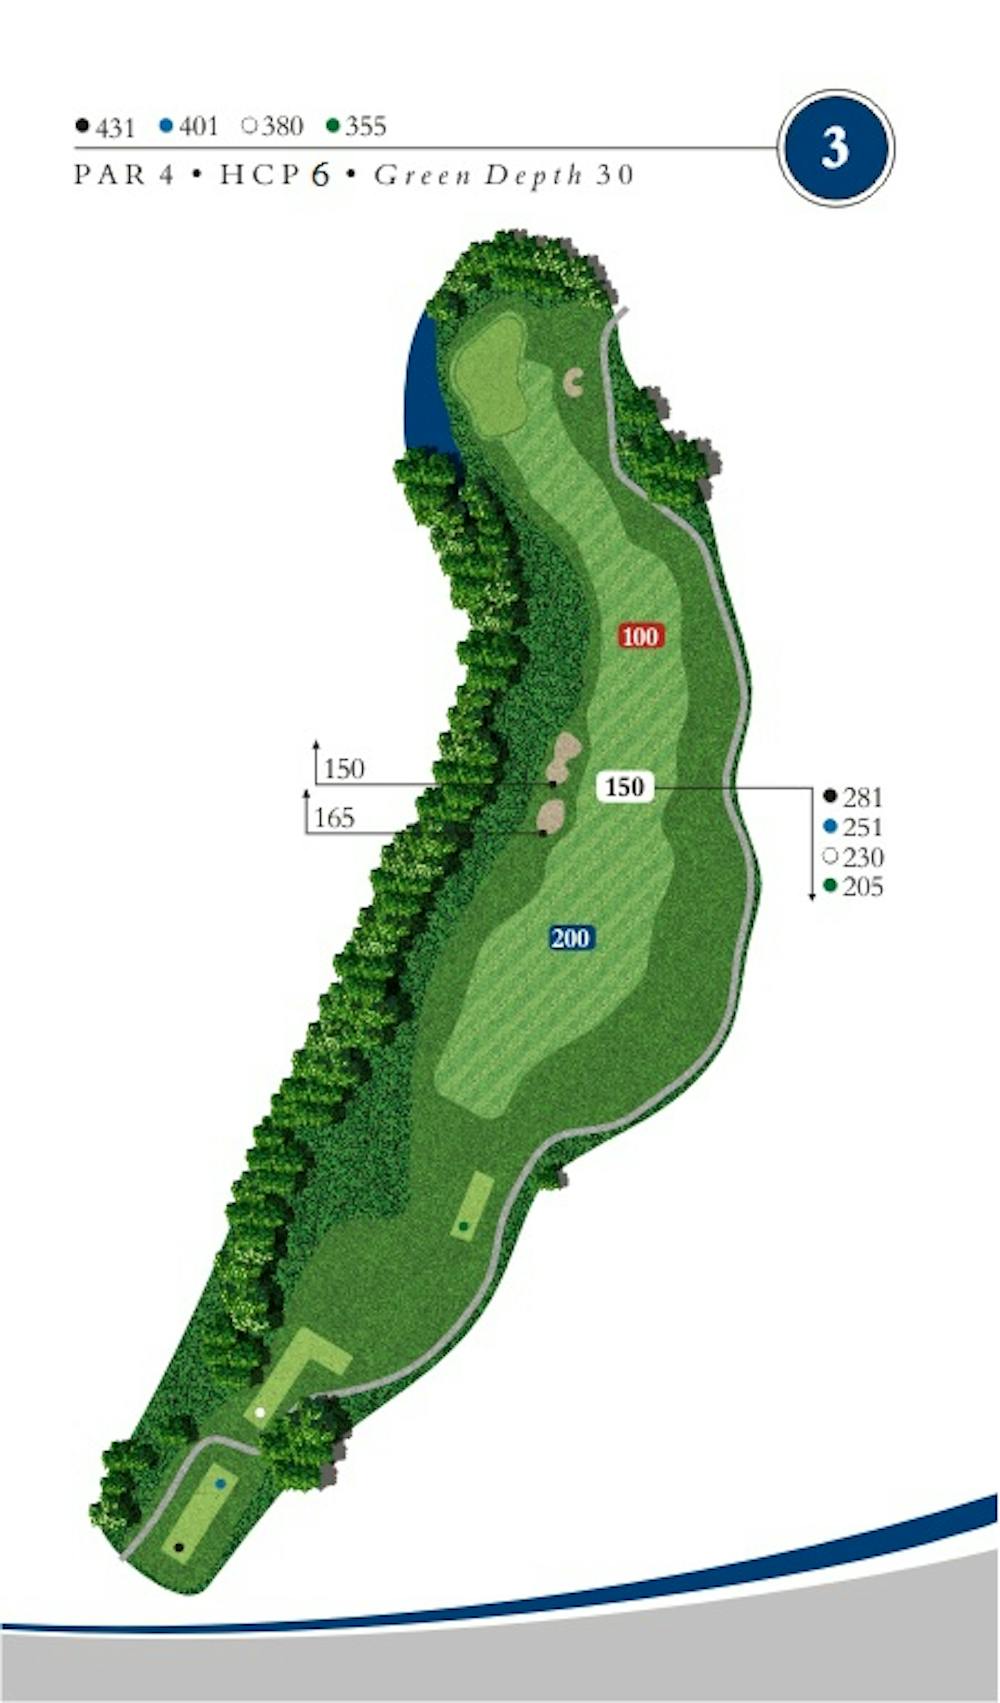
Hole #3
Par 4
Handicap-6
Wetlands and a pond line the inside of this dog-leg while OB looms right, so off the tee favor the right side to avoid bunkers left and to set up an open approach shot to the green. This green is protected by water left and a bunker right. Don’t get caught admiring the natural beauty or this hole will get you!
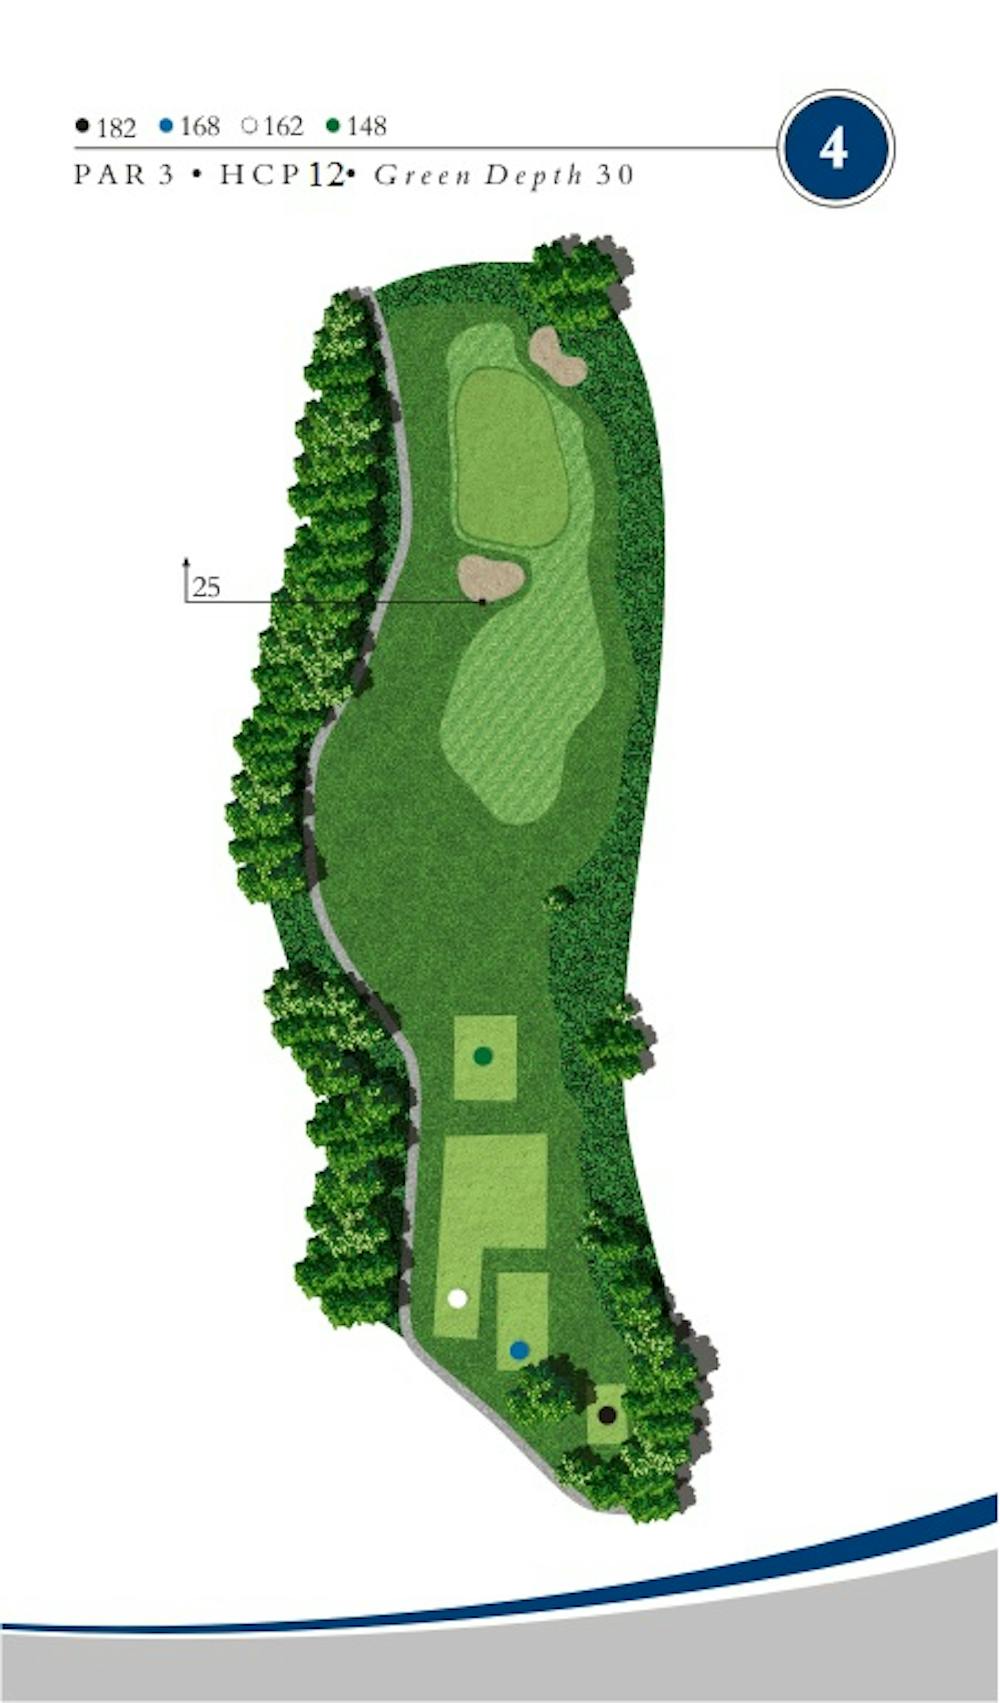
Hole #4
Par 3
Handicap-12
This par 3 requires a well-struck shot to the green that is protected by a bunker short left. Make note of the hole location because this green has two tiers. The safe miss on this hole is short-right.
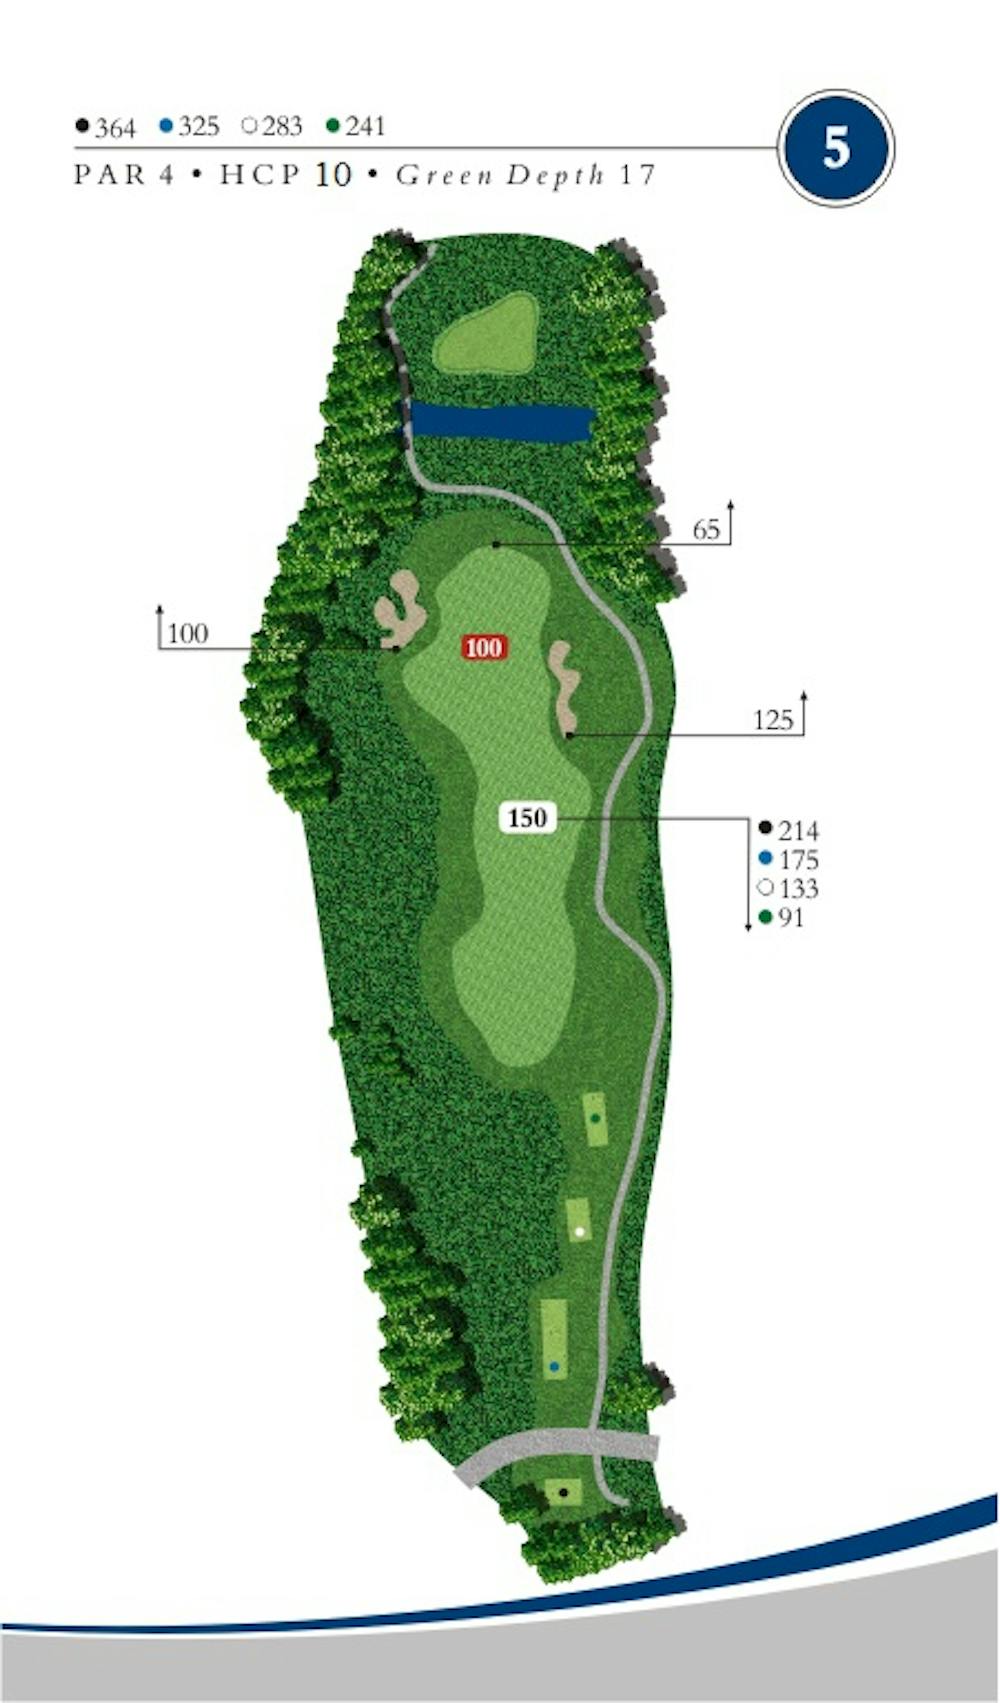
Hole #5
Par 4
Handicap-10
A short, picturesque par 4 features bunkers left and right off the tee. Leave the driver in the bag and split the fairway to have an open approach at this shallow green. You will have to be accurate on your approach with a stream and ravine to carry, and bunkers guarding this green.
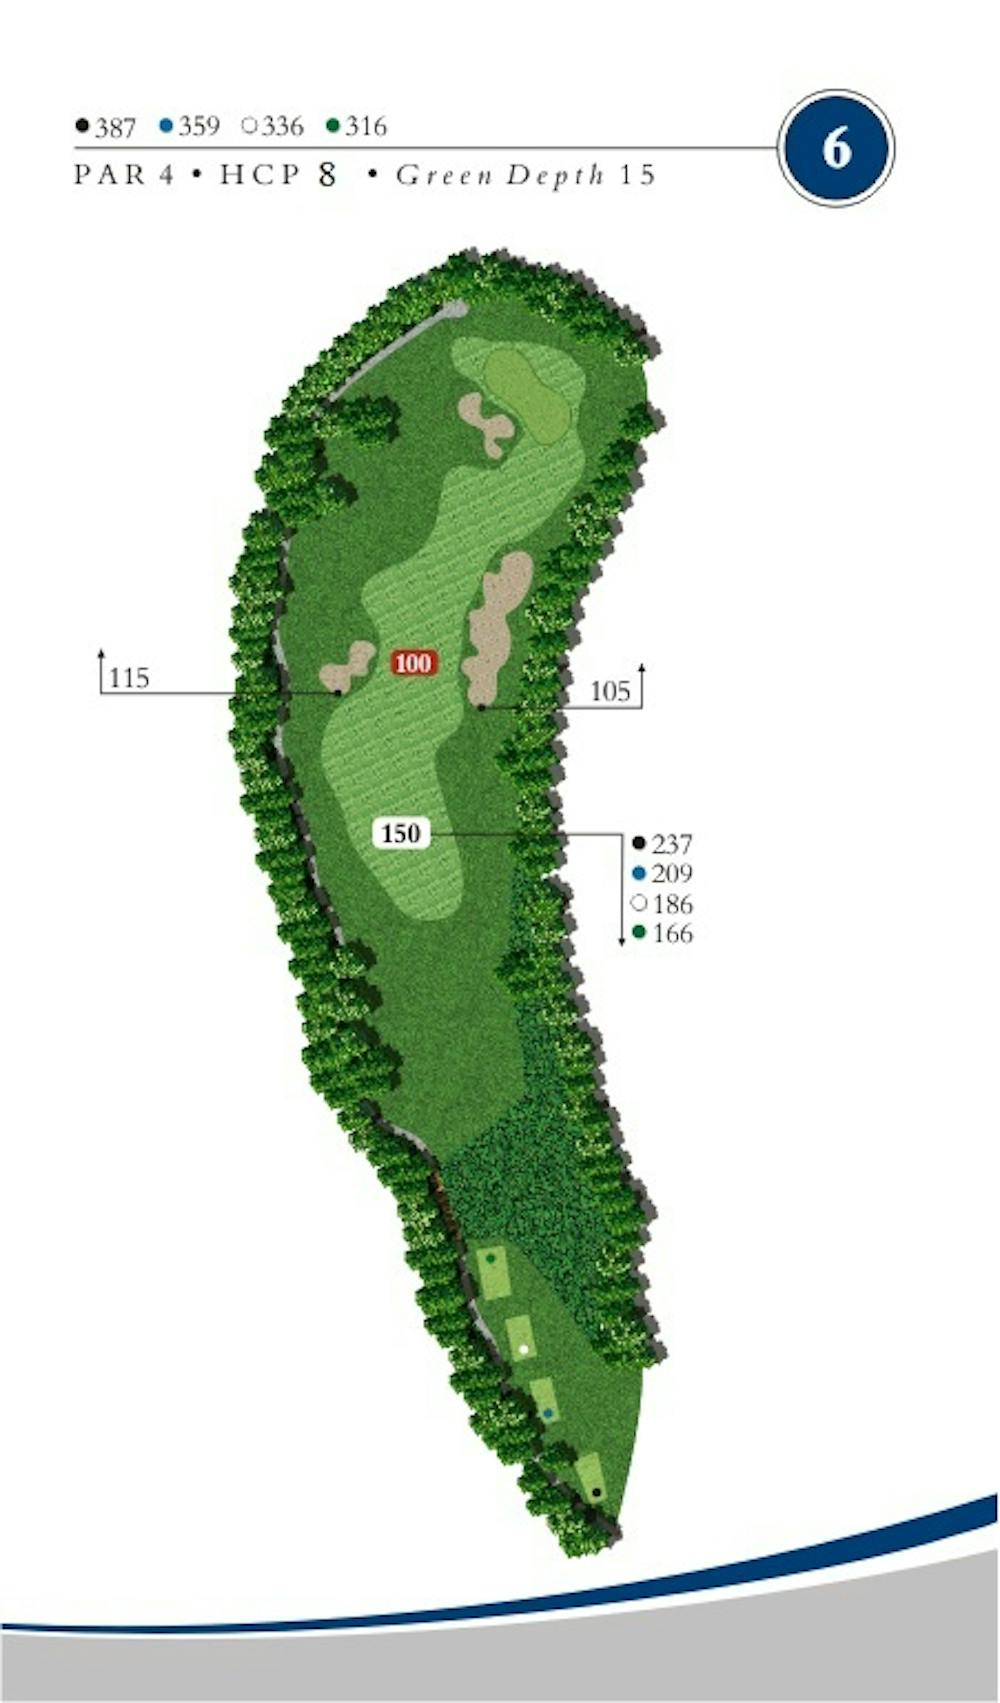
Hole #6
Par 4
Handicap-8
Tee shot accuracy is a must here to hit this tight, tree lined fairway. Favor the left side to give yourself the best angle to attack this green. A deep bunker guards the front left so make sure to favor the right side of the green.
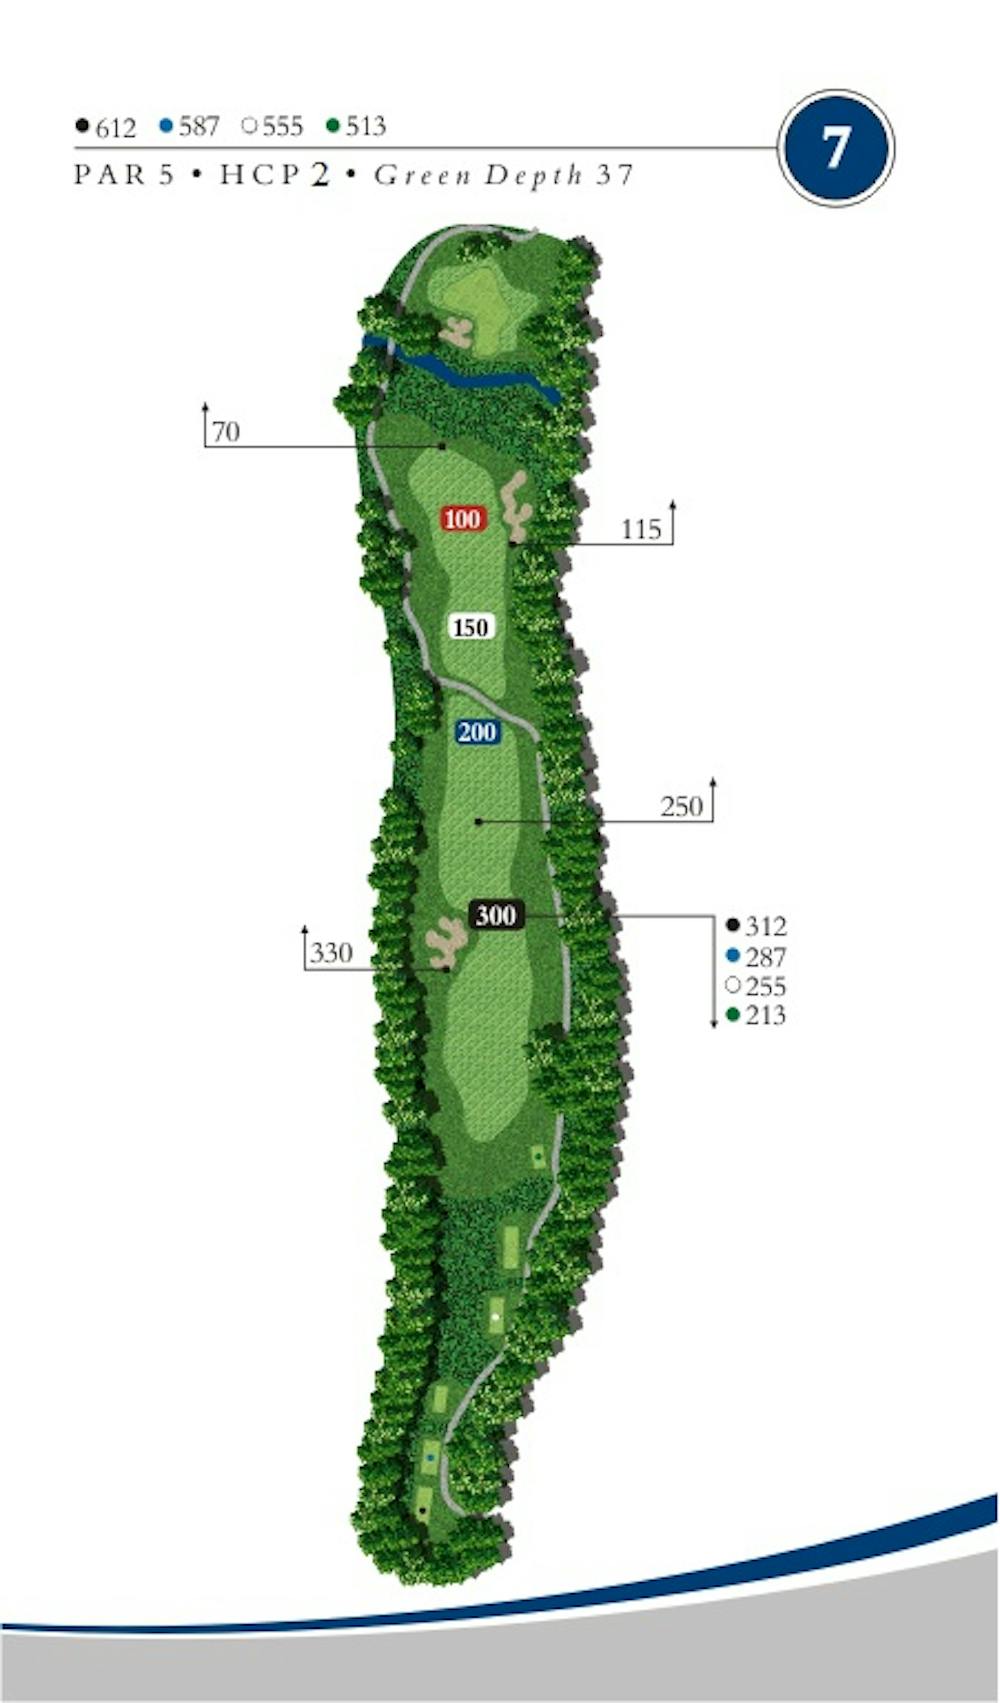
Hole #7
Par 5
Handicap-2
This monster par 5 measures over 600 yards from the tips and is the #2 handicap hole. Large trees line this fairway leading up to a green that is protected by a stream and ravine, which you must carry to get home safely. This is a true three shot hole so a proper layup will leave a short-iron, level approach over a large crossing hazard to an L-Shaped green guarded short left by a deep bunker.
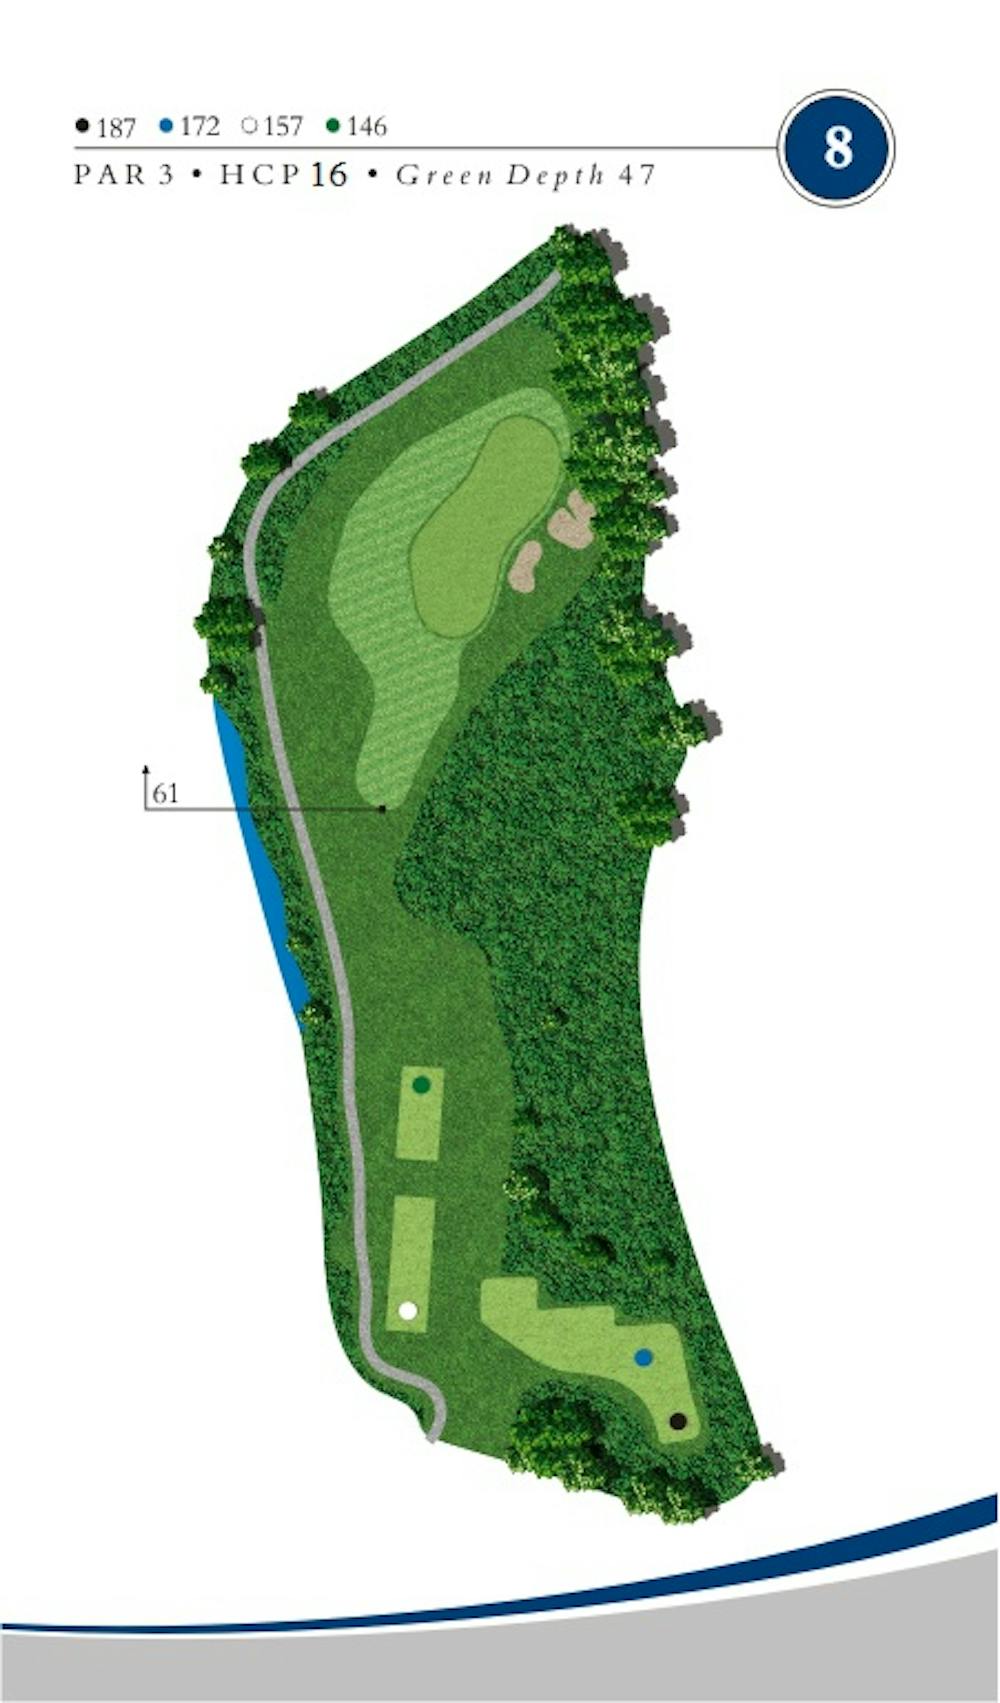
Hole #8
Par 3
Handicap-16
A beautiful par 3 that is all carry over wetlands. This green sits diagonally from front left to back right off the tee and has deep greenside bunkers on the right. Missing long will leave a difficult recovery as the putting surface slopes primarily back right to front left. There is a bail out area left here to be safe.
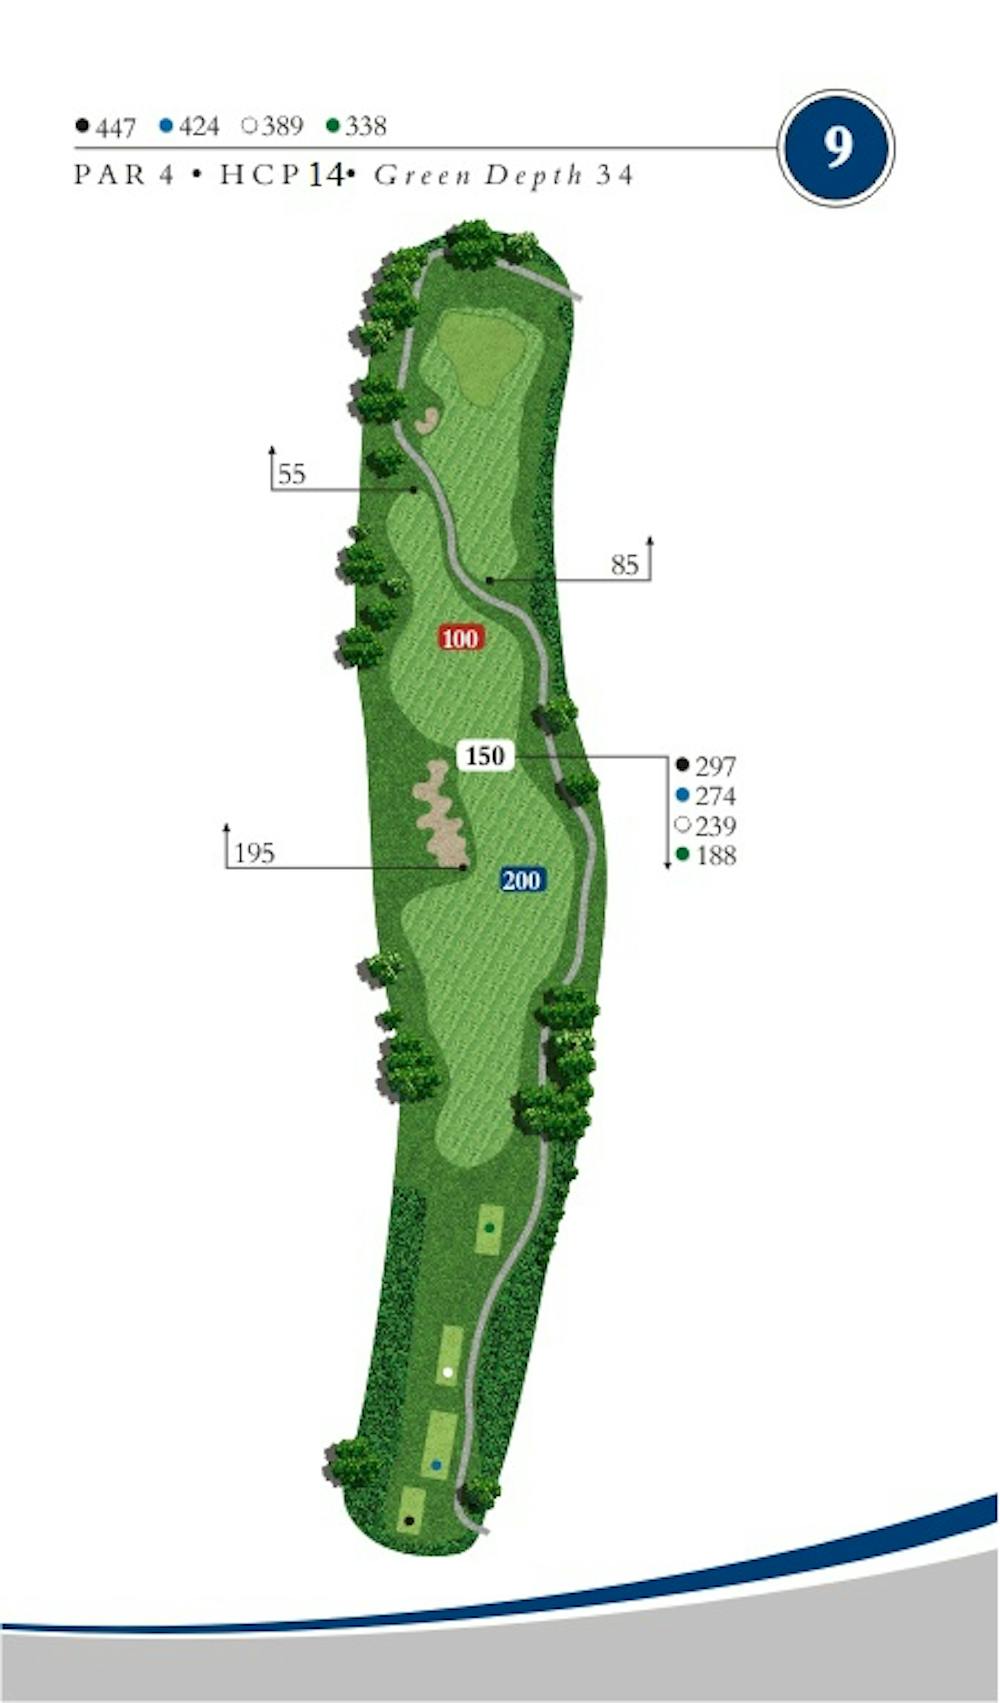
Hole #9
Par 4
Handicap-14
A slight dogleg left par 4 will close out the front side. A drive right of center is ideal, avoiding a deep bunker left and mounding right. The putting surface is the largest on the course and slopes generally right-to-left. If your drive finds the short grass, this hole provides an excellent birdie opportunity.
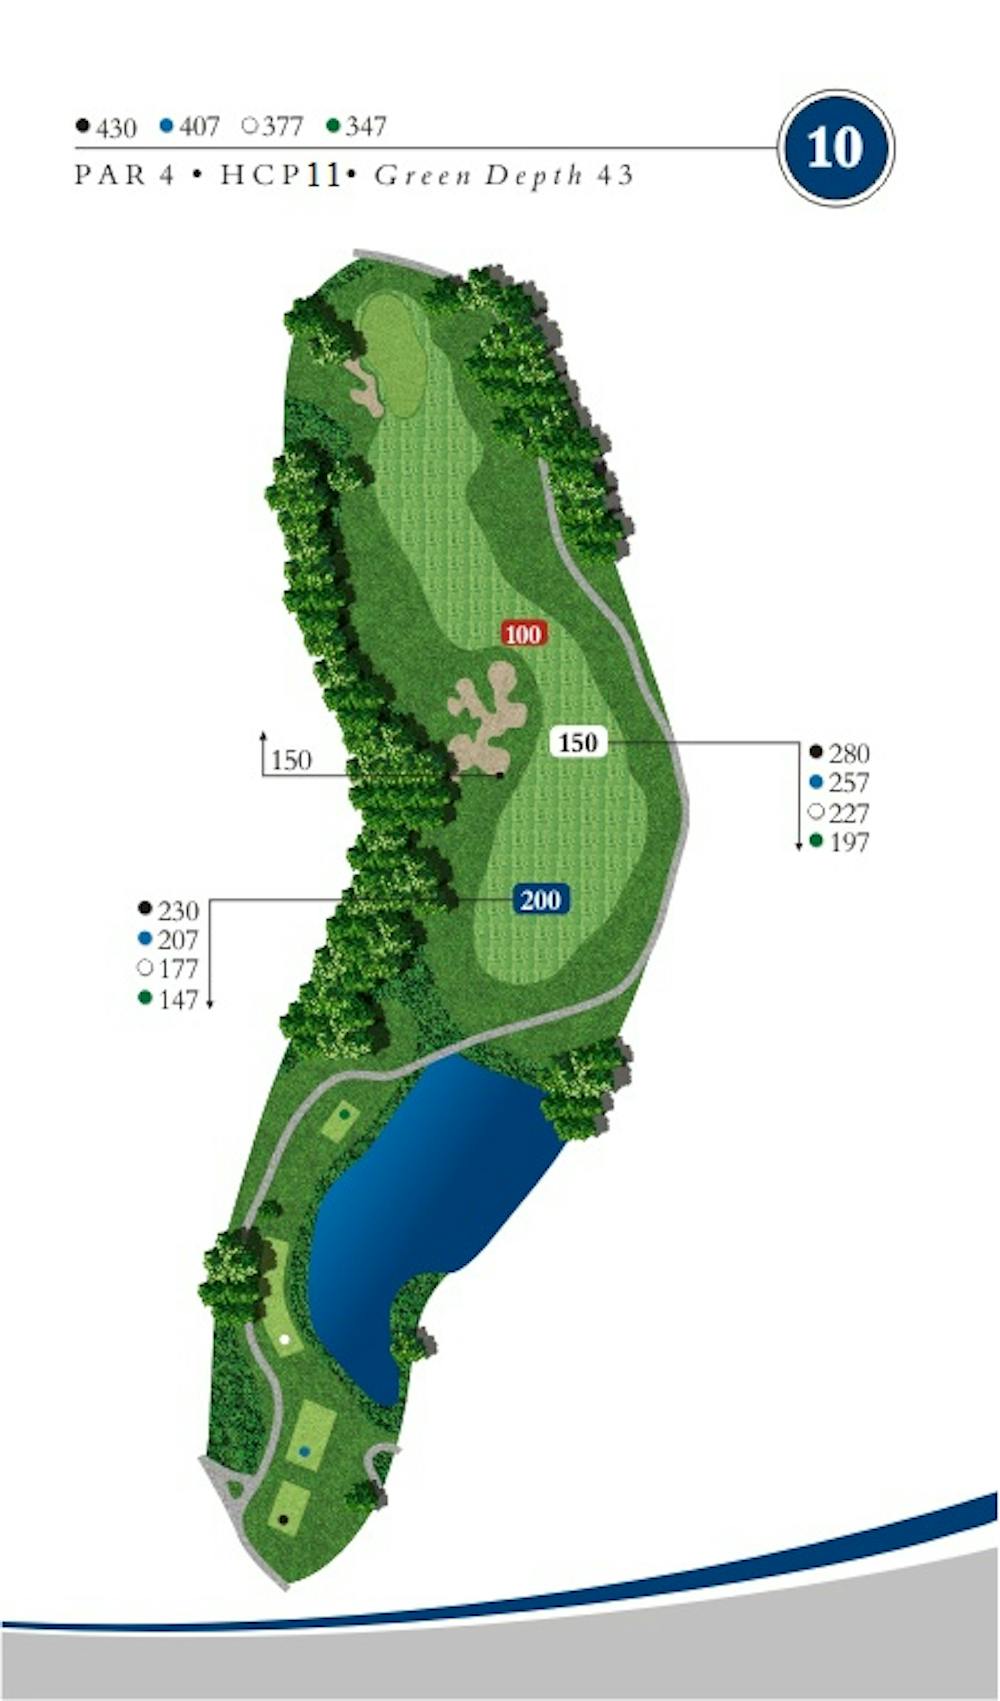
Hole #10
Par 4
Handicap-11
This is a unique par 4 is a dogleg left with a carry over water required to hit this wide fairway. A huge bunker guards the left side and the Isamu Noguchi “Family” sculptures are overlooking the right side of this fairway to give you luck. Longer hitters can challenge the corner bunker, or potentially carry the trees, leaving a short-iron approach to a long, thin green guarded by a deep bunker left.
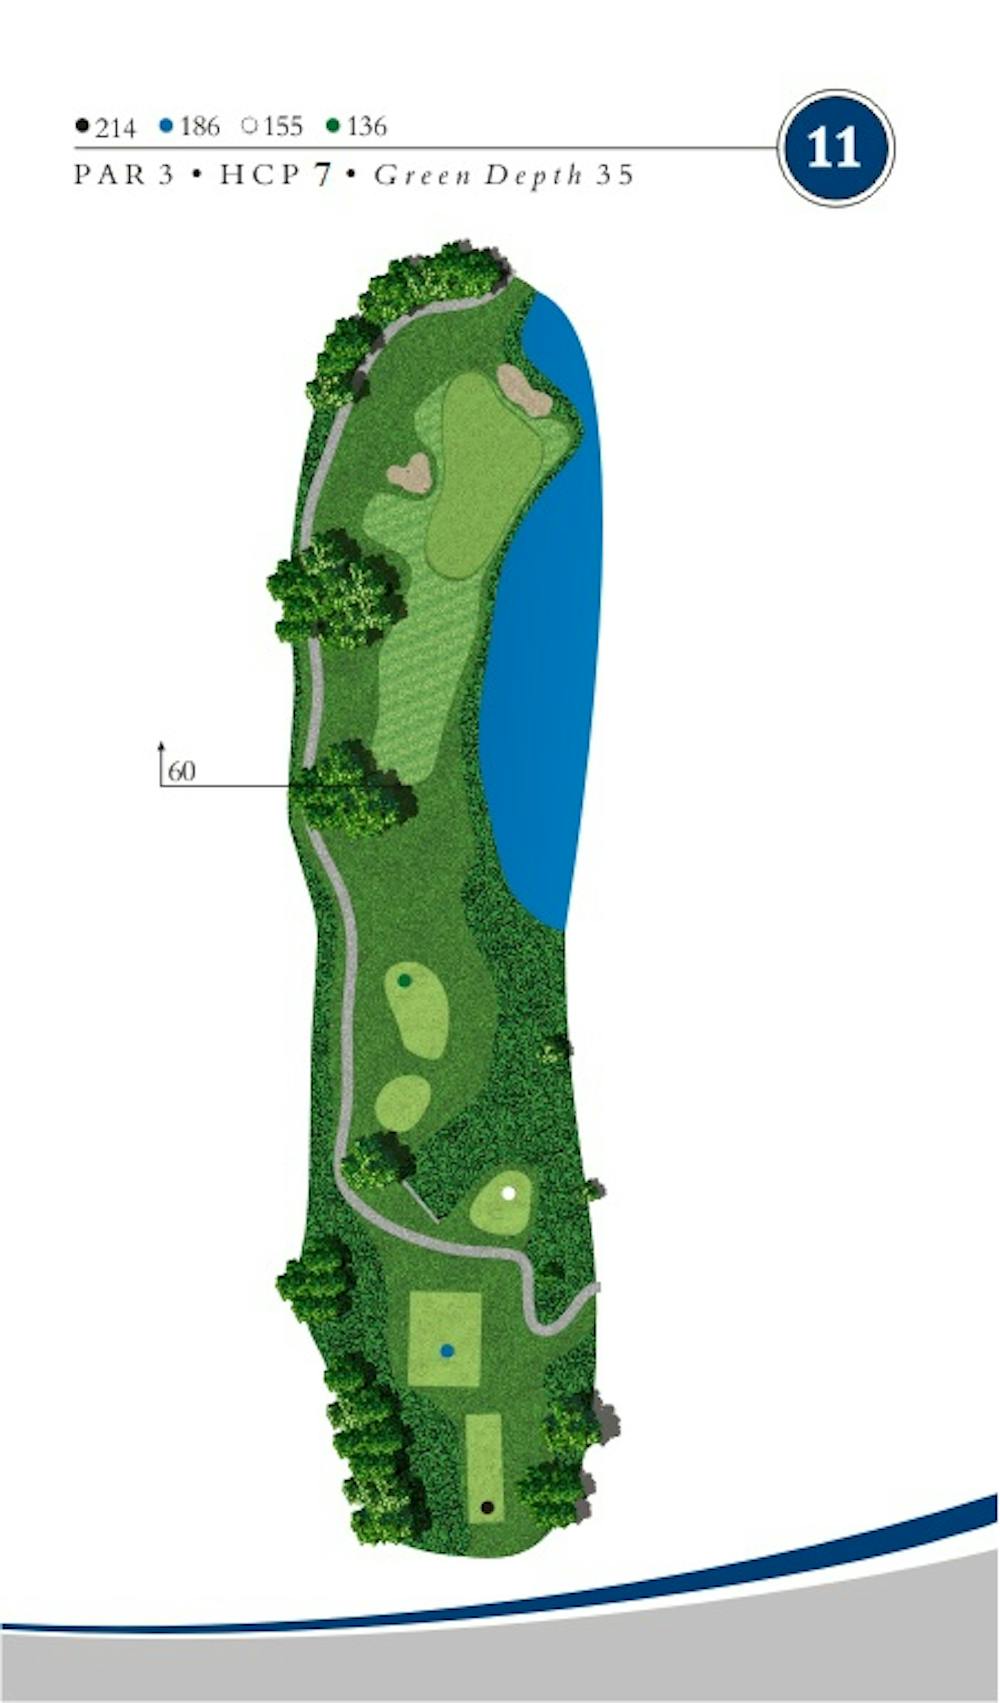
Hole #11
Par 3
Handicap-7
This scenic par 3 will make or break you. A pond sits right of the green along with bunkers left and long. A very accurate shot is required here to hit this green as any misses must be left or they will be wet!
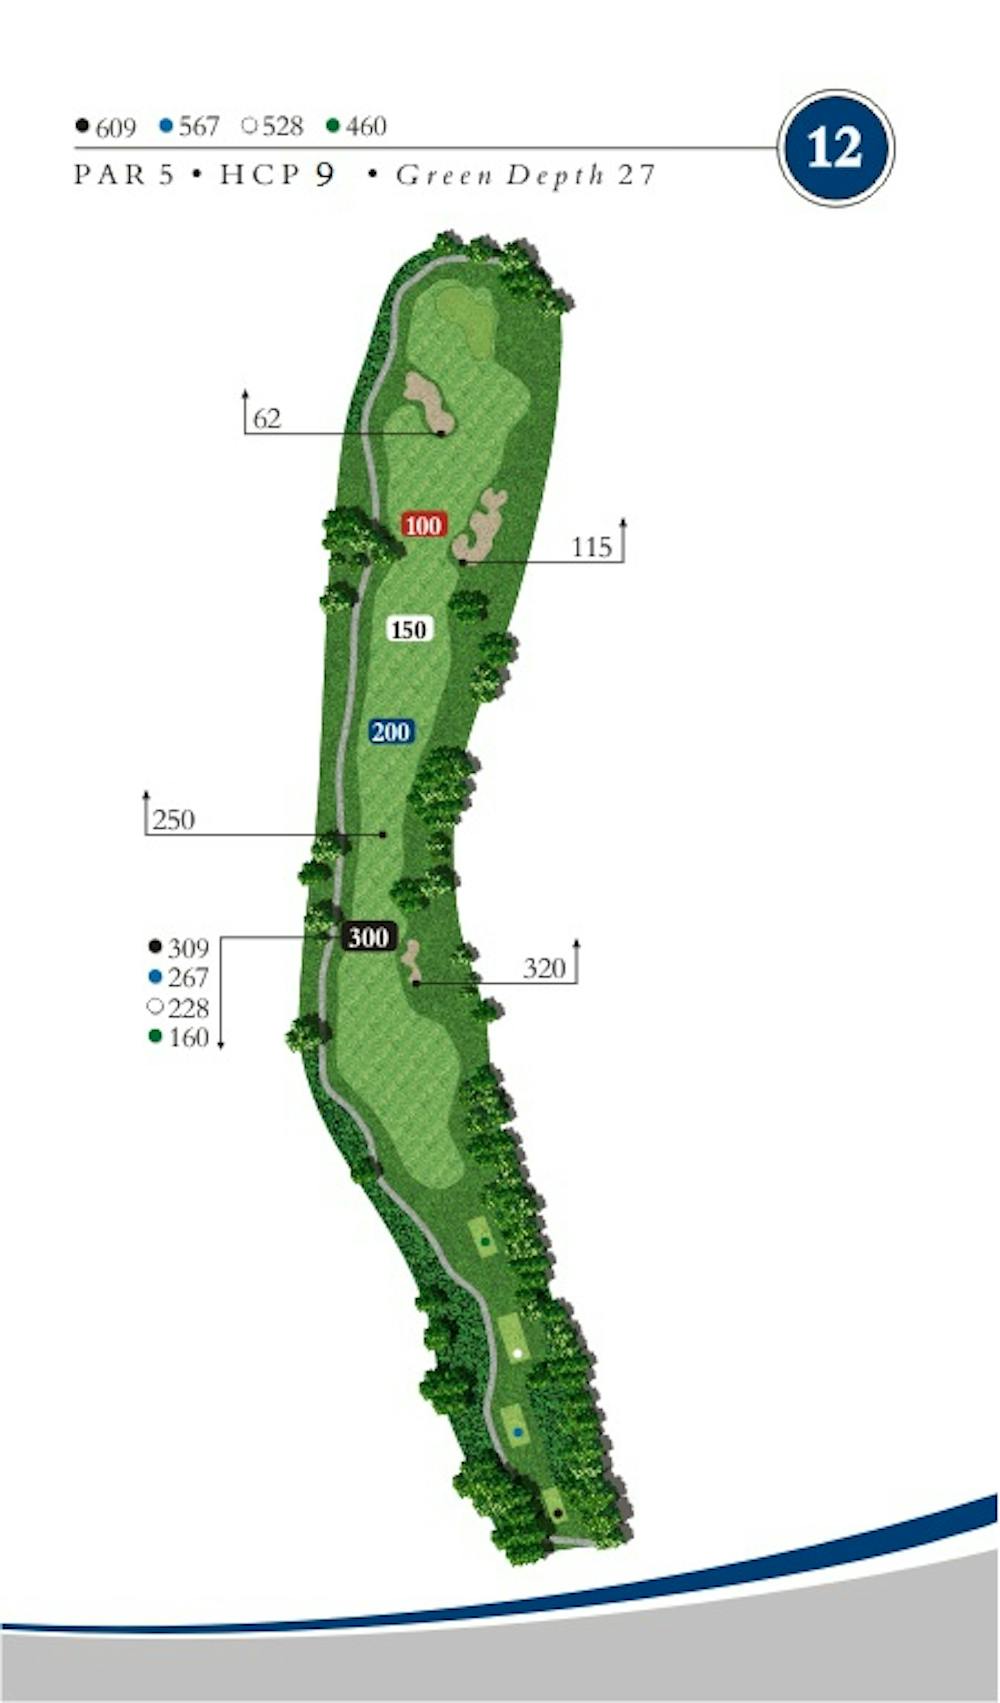
Hole #12
Par 5
Handicap-9
This par 5 stretching over 600 yards from the back tees actually emphasizes placement rather than length. This hole doglegs slightly to the right and features a bunker that looks to be greenside, but is actually set back 62 yards from the green. Missing long will leave a difficult recovery for par. Don’t be deceived!

Hole #13
Par 4
Handicap-17
A chance to get one back. This short par 4 is drivable for the long hitter, but doesn’t come easy. Bunkers guard the left side of the green and another bunker awaits on the right short of the green to gobble up any errant shots.
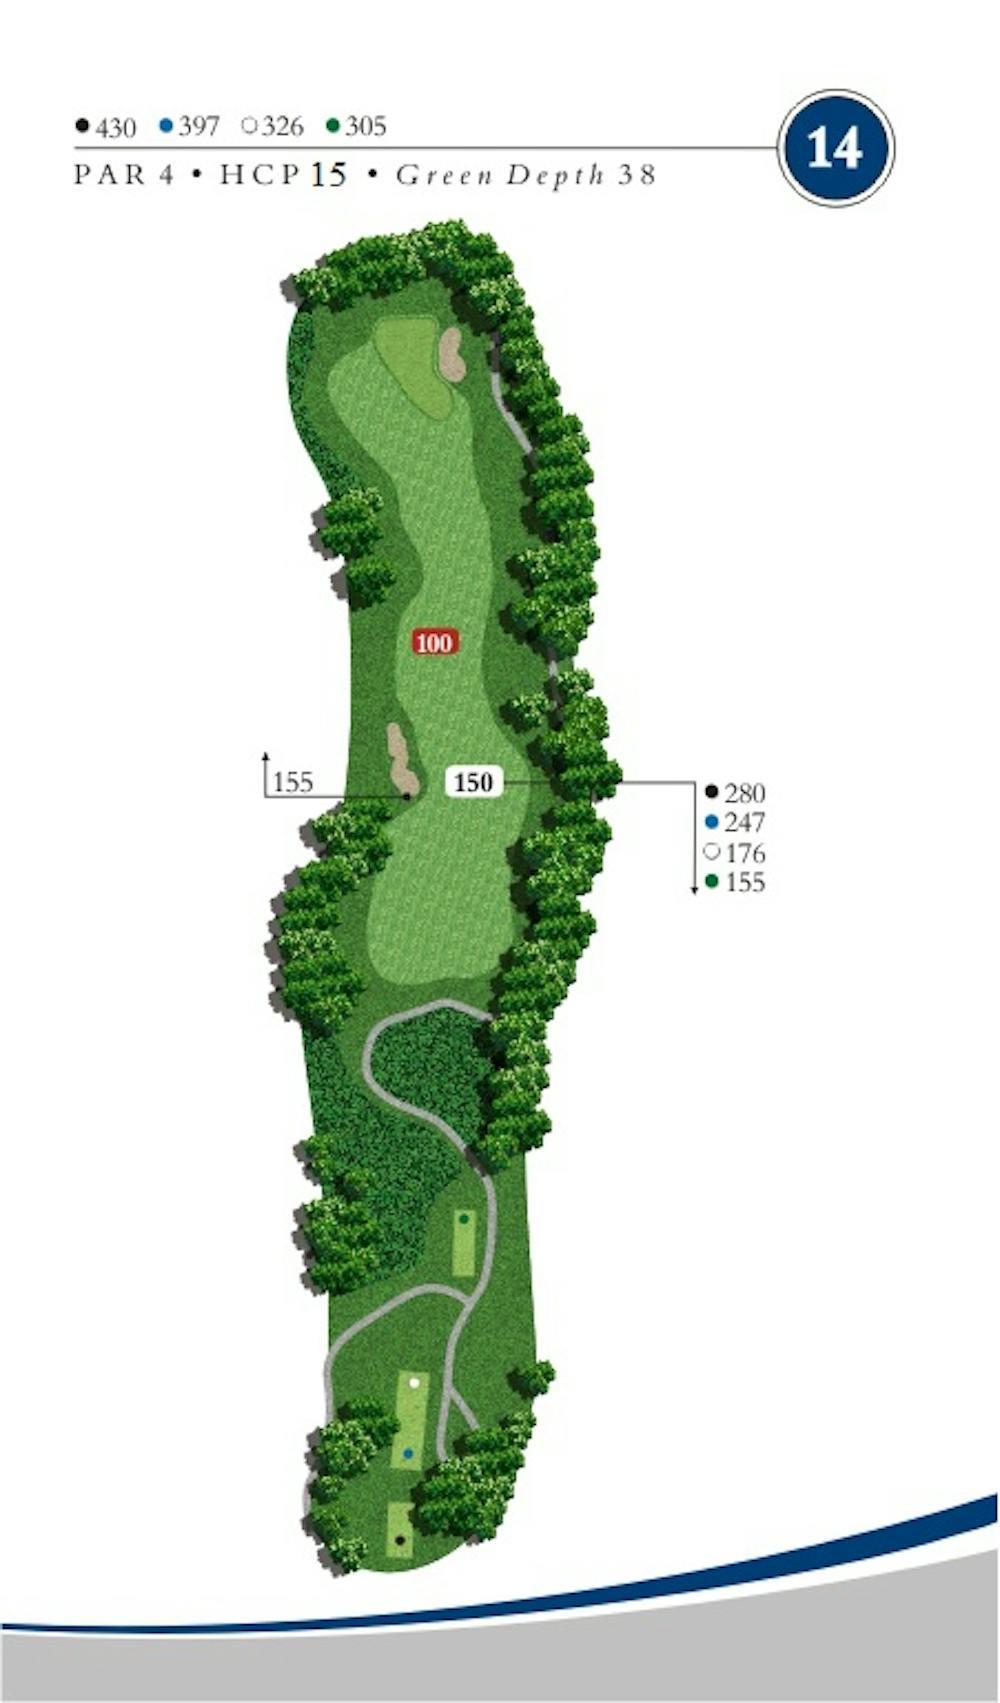
Hole #14
Par 4
Handicap-15
This intimidating look off the tee demands accuracy to split this tree-lined fairway. Thread the needle and avoid the left fairway bunker to give yourself a good look at this green. Don’t go long however on your approach, and if you miss, miss left to stay out of the right greenside bunker.
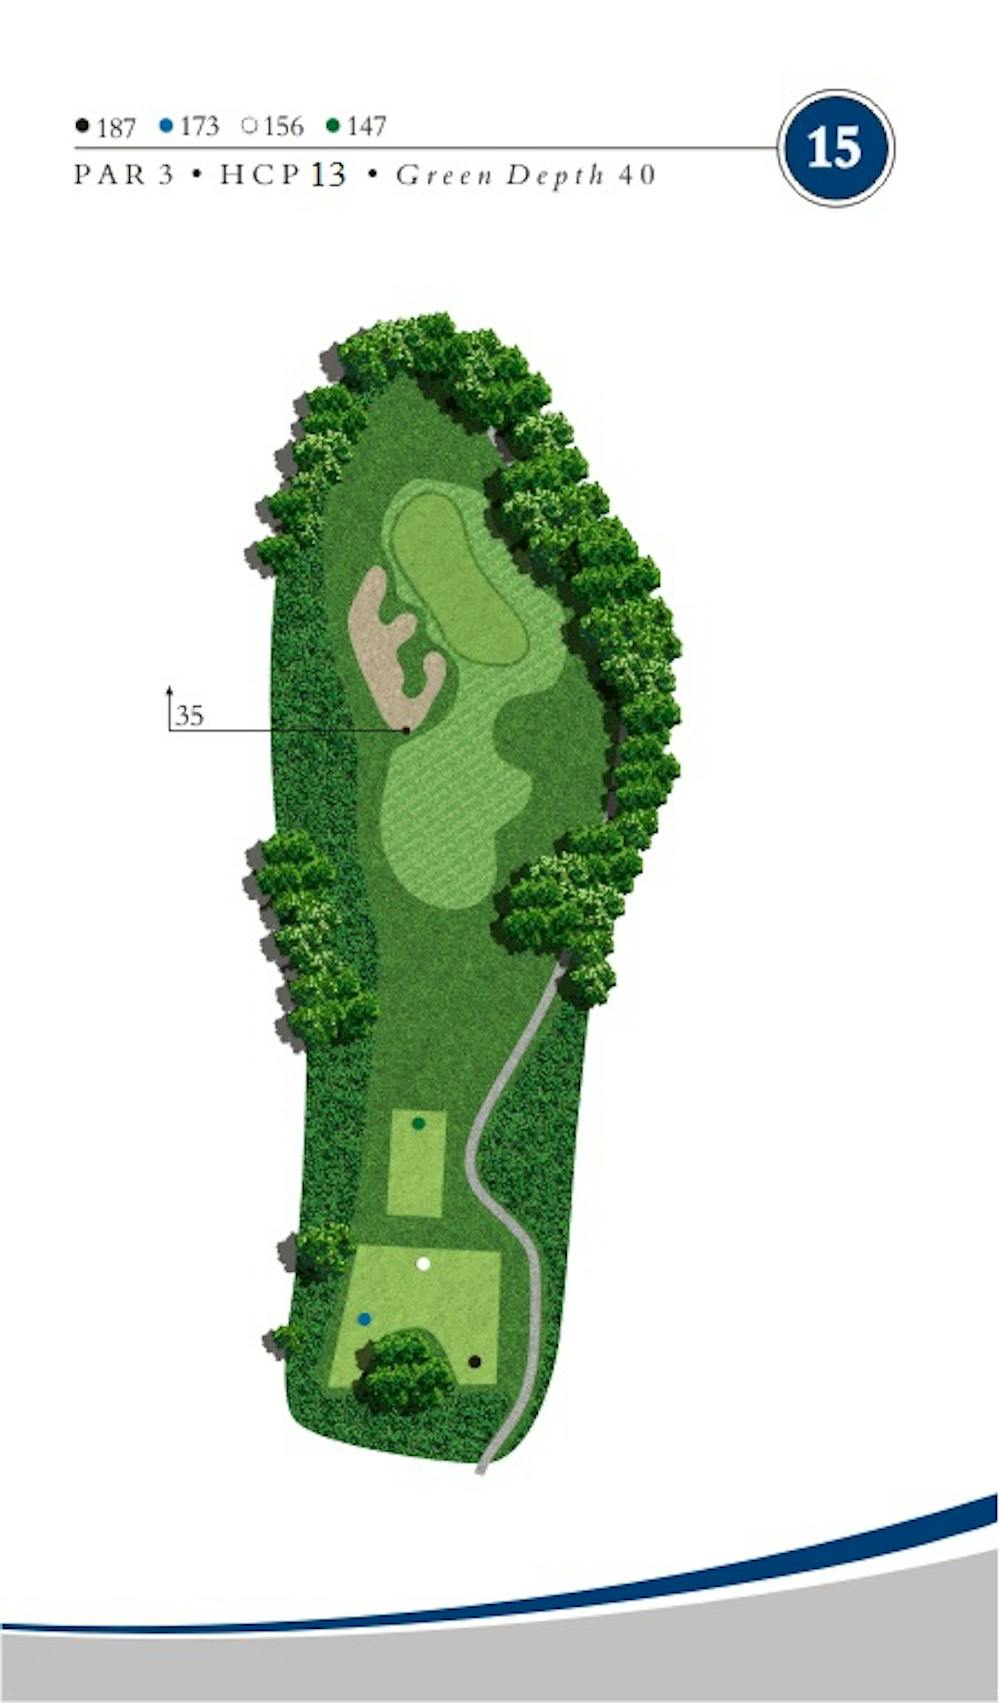
Hole #15
Par 3
Handicap-13
This par 3 is heavily guarded by deep bunkers short and left of the green with trees guarding the right and any long shots. Choose an extra club to avoid the trouble and walk away with a par after admiring Francis Gillette’s historic house left of the fairway.
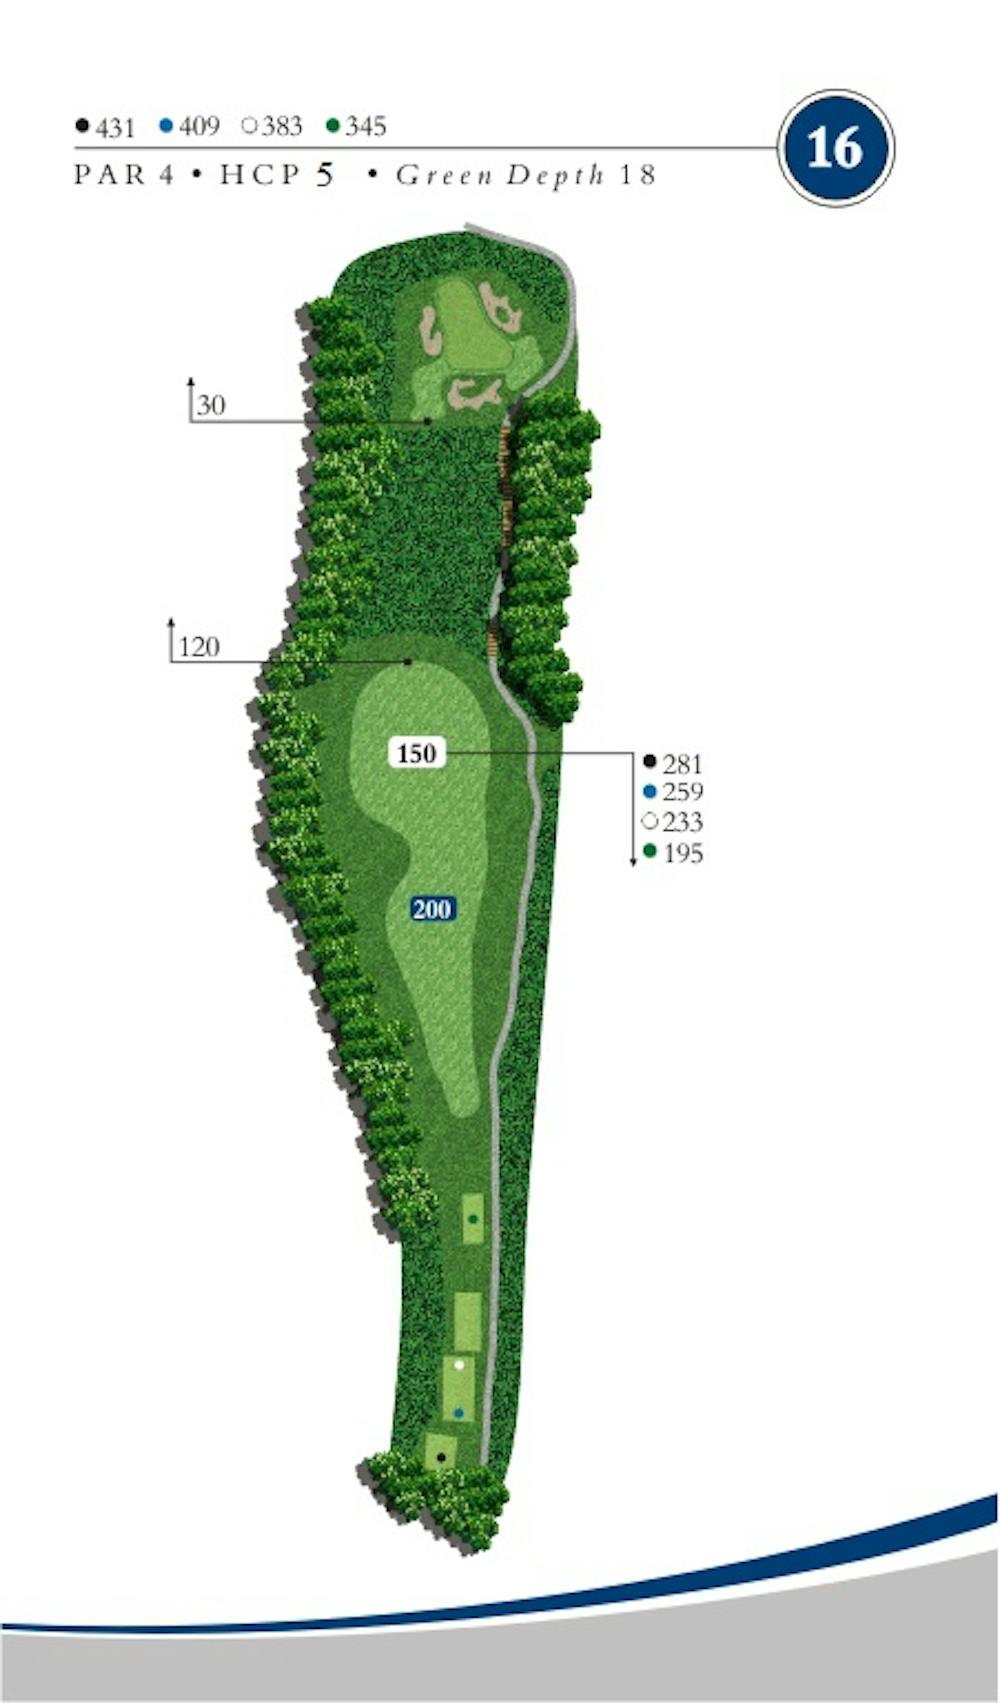
Hole #16
Par 4
Handicap-5
This hole plays slightly downhill off the tee but precision is required as it is the first of three tough finishing holes. This fairway must be hit in order to have any chance of an open approach shot to the green. Leave yourself about 150 yards for your second shot so you have a level lie because your next shot is all carry over wetlands.
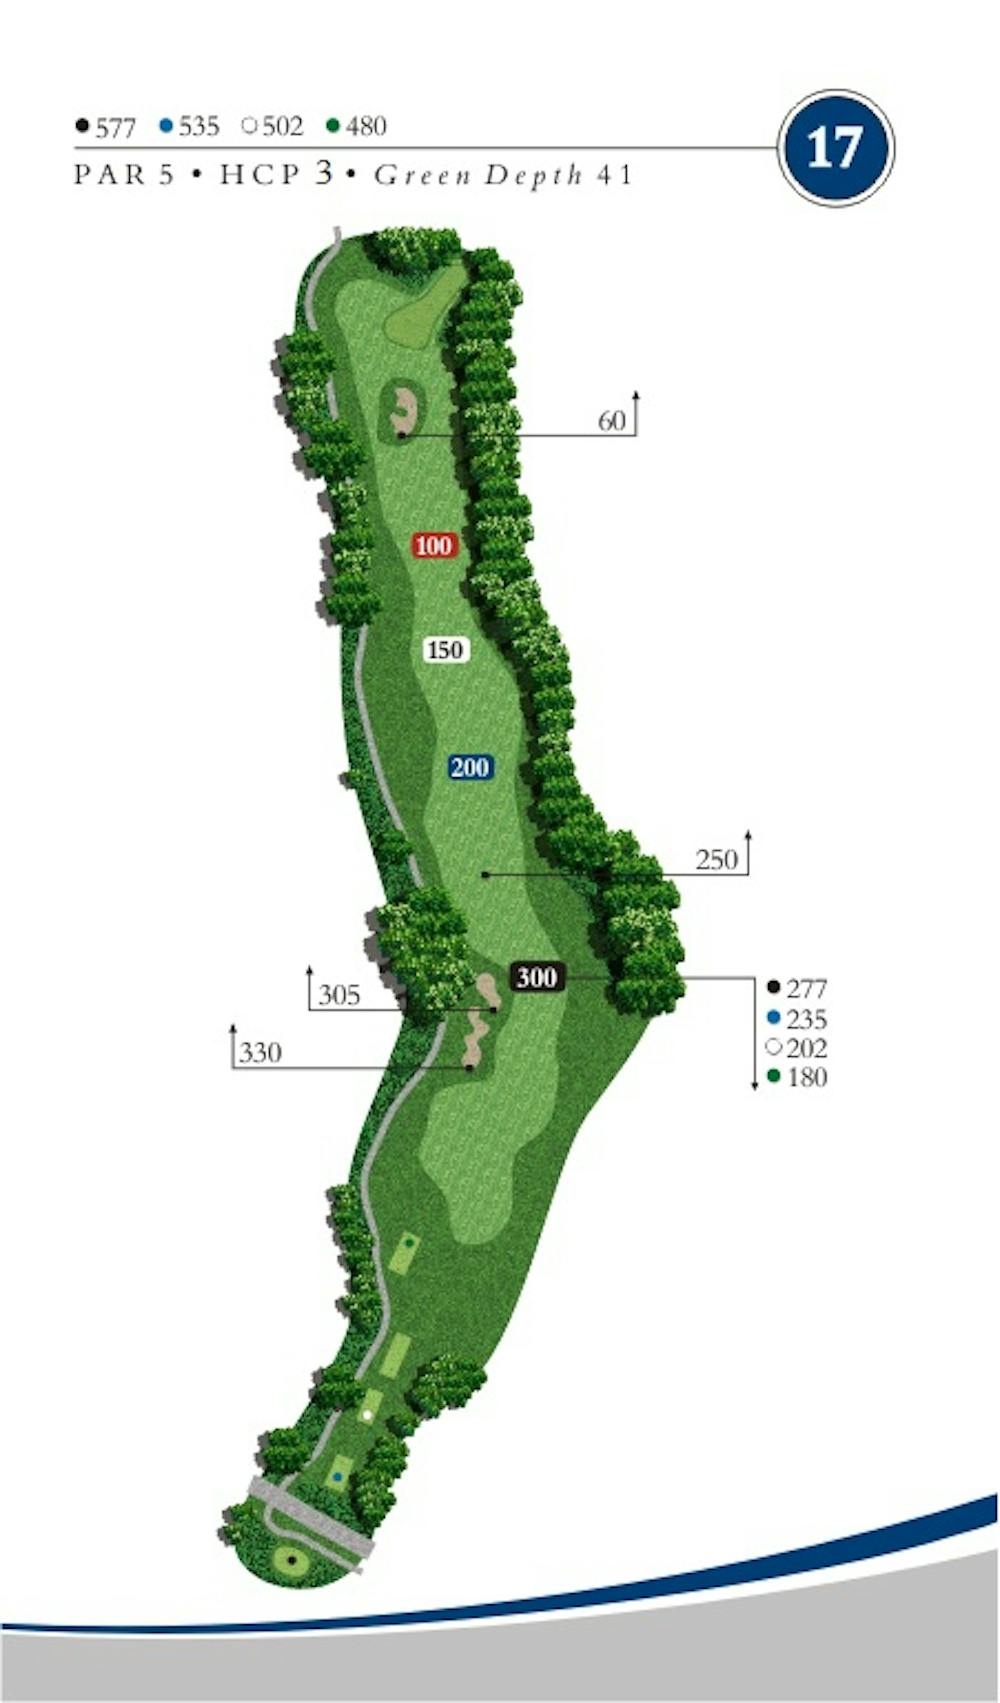
Hole #17
Par 5
Handicap-3
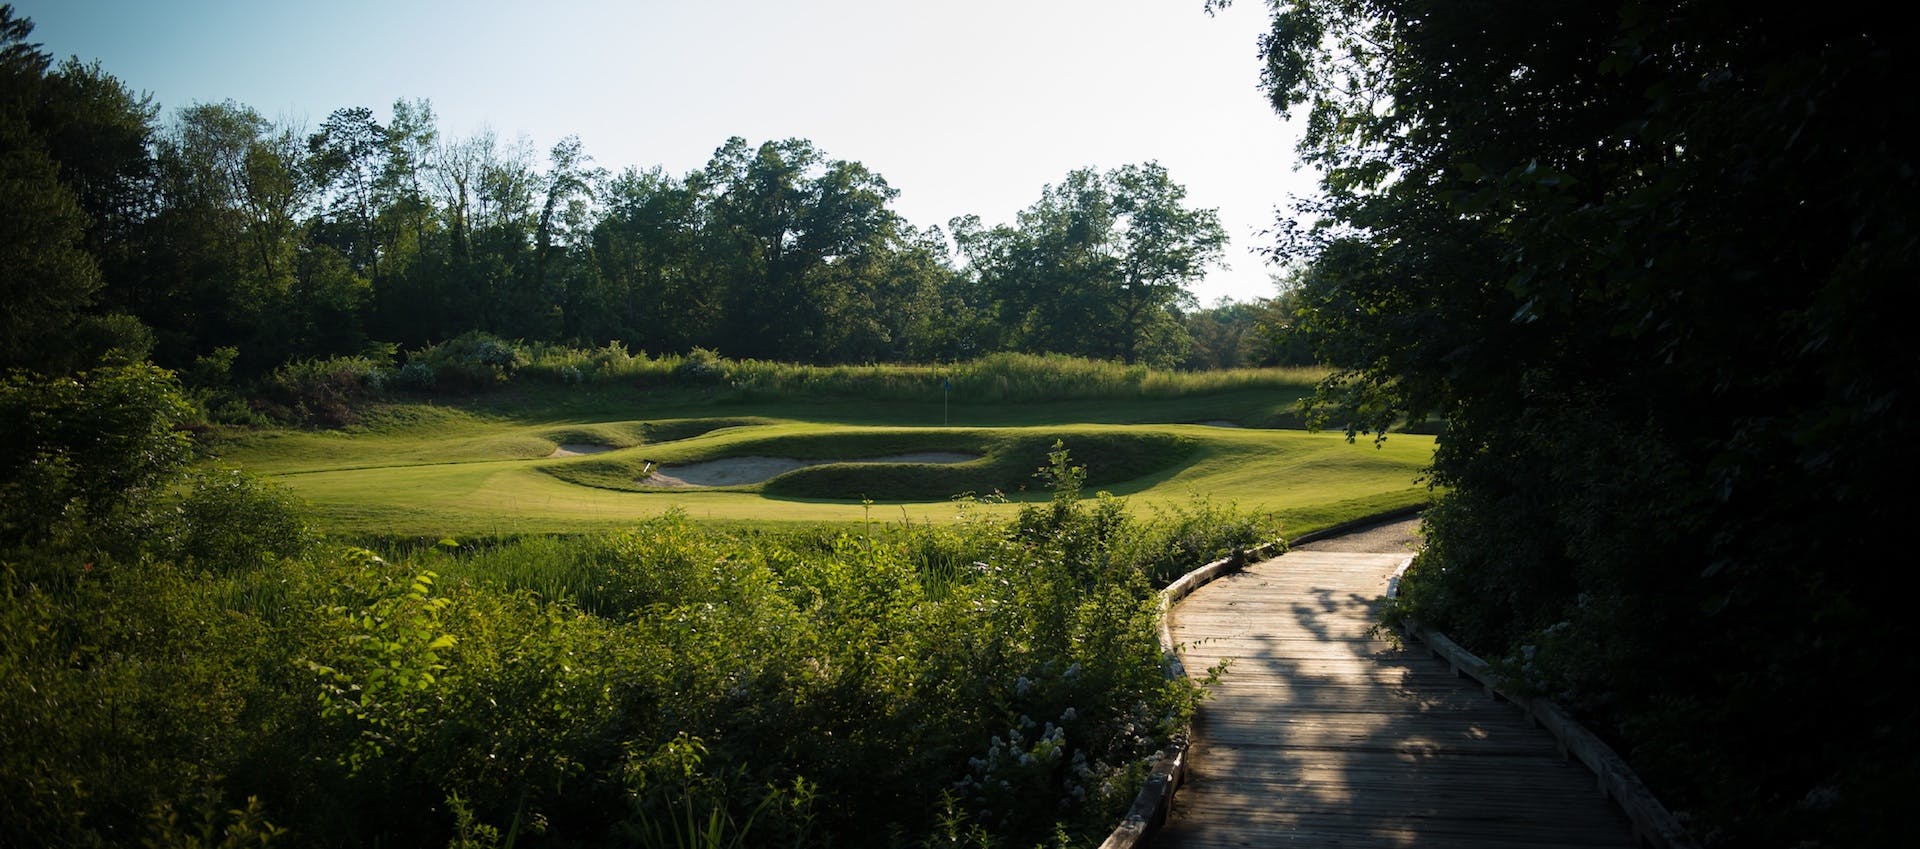
The second par five is known for its unique green that was partially built on an existing bridge over wetlands. Your second shot must be up the left side in order to get a look at this green. The green is guarded by hazards short right and long. A large collection area will catch any shots missing the green short left.
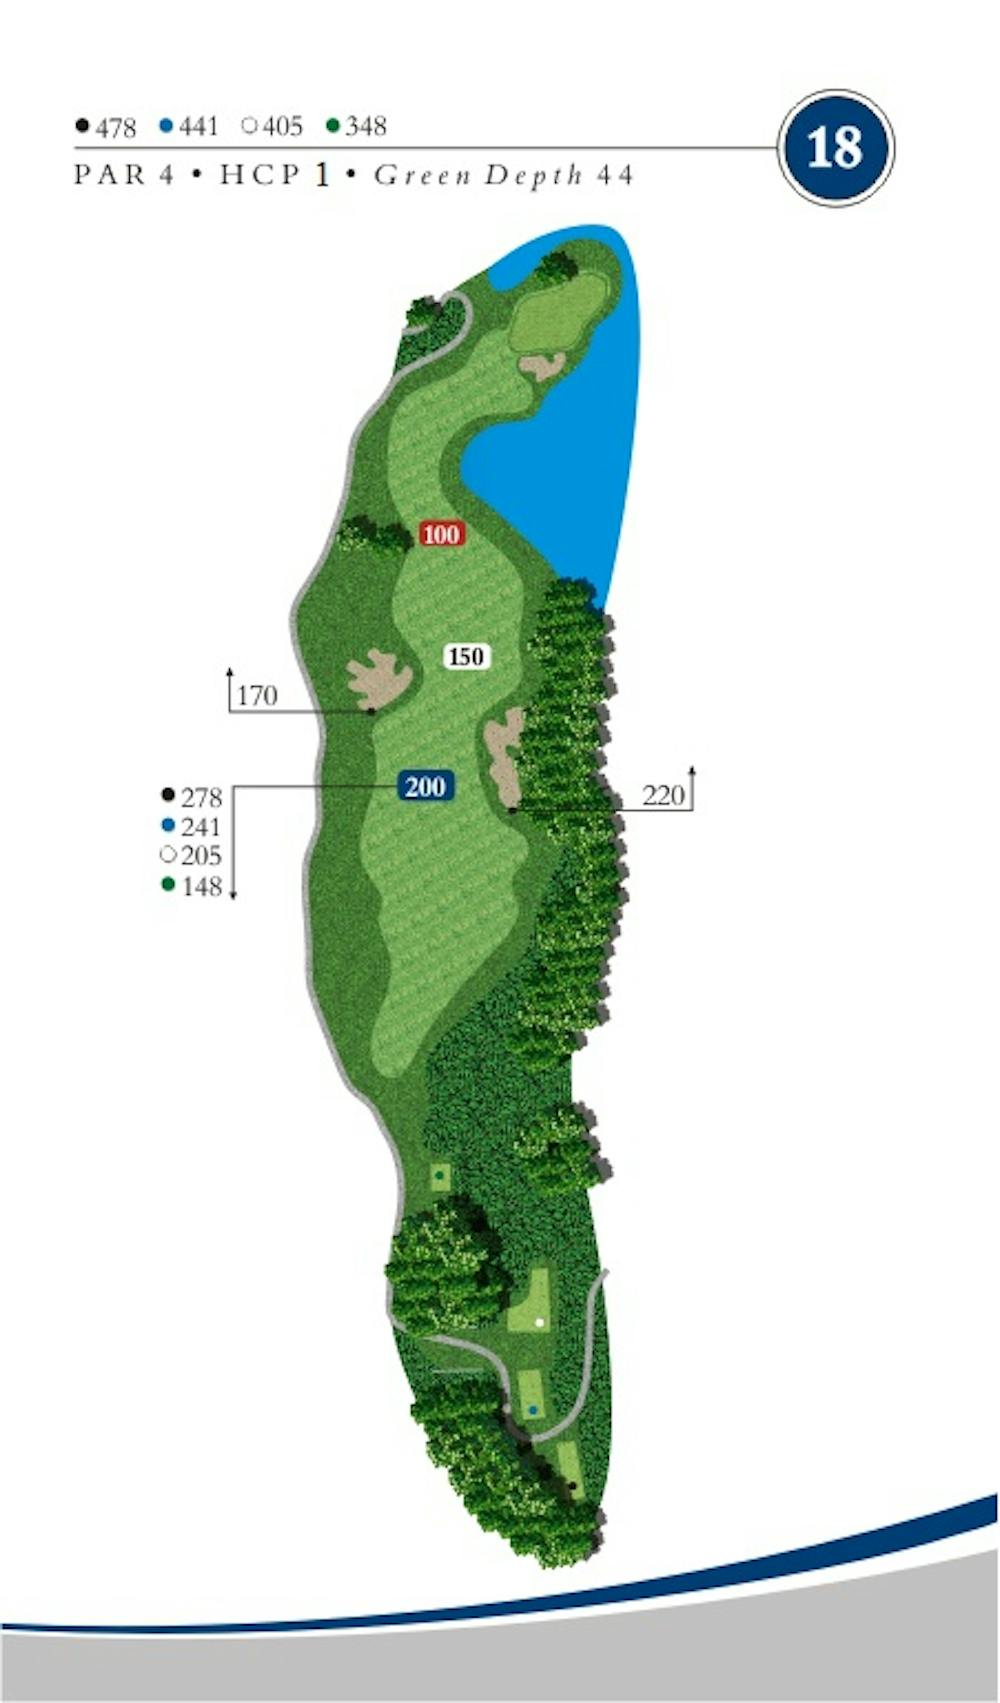
Hole #18
Par 4
Handicap-1
The closing hole is the #1 handicap hole and is the longest par 4 on the course. You must first carry the wetlands off the tee and then split the fairway bunkers left and right. If that wasn’t enough you now must carry the pond and bunker that guard the front of this peninsula green. Any misses here must be left to avoid all the trouble right.